Skillets
The heart of Panhandler is the .skillet.yaml file. This allows a set of configuration snippets, known as a skillet, to be shared and consumed as a single unit. For example, to configure a default security profile you may need to configure multiple different parts of the PAN-OS configuration. Panhandler allows you to group those different ‘pieces’ and share them among different devices as a single unit. Often times these configuration bits (affectionately called ‘skillets’) need slight customization before deployment to a new device. The .skillet.yaml file provides a means to templatize these configurations and present a list of customization points, or variables, to the end user or consumer.
IronSkillet
The very first, and most well known, Skillet is IronSkillet. This was developed as a way to share best practice Day One configurations in an easy to deploy manner without requiring ‘a million clicks’.
Much more information about IronSkilet can be found on Readthedocs.
Basic concepts
In order to add multiple ‘bits’ of configuration to a device, we need to know the following things:
- XML Configuration fragment with optional variables defined in jinja2 format
- XPath where this xml fragment should be inserted into the candidate configuration
- the order in which these XML fragments must be inserted
- a list of all variables that require user input
- target version requirements. For example: PAN-OS 8.0 or higher
This is all accomplished by adding multiple files each containing an XML configuration fragment and a .skillet.yaml file that describes the load order, variables, target requirements, etc.
YAML syntax
Each skillet is structured as a series of files in a single directory. This directory may contain a number of template files (XML, YAML, JSON, etc) and a .skillet.yaml file. Note the following:
- A .skillet.yaml file that is formatted with using YAML with the following format:
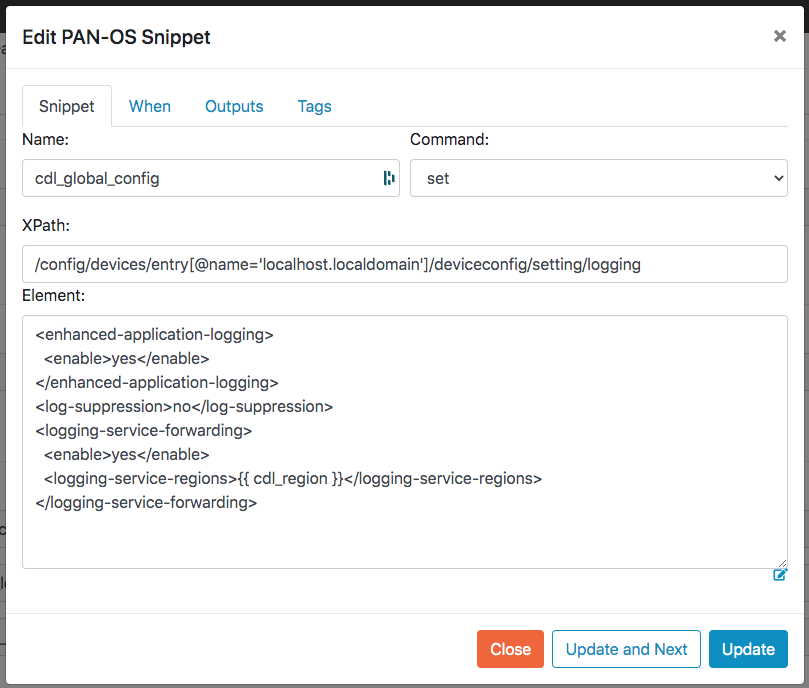
name: config_set_id
label: human readable text string
description: human readable long form text describing this Skillet

labels:
  collection:
    - Example Skillets

variables:
  - name: INF_NAME
    description: Interface Name
    default: Ethernet1/1
    type_hint: text

snippets:
  - xpath: some/xpath/value/here
    name: config_set_knickname
    file: filename of xml snippet to load that should exist in this directory
Note
You may also use an ‘element’ attribute instead of the ‘file’ attribute if you would rather include the XML fragment inline as opposed to in a separate file.
- Multiple configuration files. Each should contain a valid template fragment and may use jinja2 variables. These templates may be XML, JSON, YAML, Text, etc. For PAN-OS devices, these are XML fragments from specific stanzas of the PAN-OS device configuration tree.
Metadata details
Each .skillet.yaml file must contain the following top-level attributes:
- name: unique name of this Skillet
- label: Human readable label that will be displayed in the Panhandler UI
- description: Short description to give specific information about what this Skillet does
- type: The type of skillet. This can be ‘panos’, ‘panorama’, ‘rest’, or others.
- variables: Described in detail below
- snippets: a list od dicts. The required attributes vary according to Skillet tupe
Optional top level attributes:
- depends: List of dicts containing repository urls and branches that this skillet depends on
- labels: Extensible list of key/value pairs that offers additional, optional, functionality. See here for a
- complete list Labels.
Note
Each Metadata file type has it’s own format for the ‘snippets’ section. file and xpath are only used in panos and panorama types. Other types such as template or rest may have a different format.
Skillet Collections
Each Skillet should belong to at least one ‘Collection’. Collections are used to group like skillets. SKillets with no collection label will be placed in the ‘Unknown’ Collection.
To configure one or more collections for your Skillet, add a collection attribute to the ‘labels’ dictionary.
labels:
  collection:
    - Example Skillets
    - Another Collection
    - Yet another Collection
See Labels for a complete list of all labels supported by Panhandler.
Snippet details per Metadata type
Required fields for each metadata type is listed below:
- panos, panorama, panorama-gpcs
- name - name of this snippet
- cmd - operation to perform. Default is ‘set’. Any valid PAN-OS API Command is accepted (set, edit, override, get, show, etc)
- xpath - XPath where this fragment belongs
- file - path to the XML fragment to load and parse
- element - inline XML fragment to load and parse. Can be used in leu of a separate ‘file’ field
See Example here: Example PAN-OS Skillet
- pan_validation
- name - name of the validation test to perform
- cmd - validate, validate_xml, noop, or parse. Default is validate
- test - Boolean test to perform using jinja expressions
See Example here: Example Validation Skillet
- template
- name - name of this snippet
- file - path to the jinja2 template to load and parse
- template_title - Optional title to include in rendered output
- terraform
- None - snippets are not used for terraform
See Example here: Example Terraform Skillet
- rest
name - unique name for this rest operation
path - REST URL path component path: http://host/api/?type=keygen&user={{ username }}&password={{ password }}
operation - type of REST operation (GET, POST, DELETE, etc)
- payload - path to a jinja2 template to load and parse to be send as POSTed payload
Note
For x-www-form-urlencded this must be a json dictionary
- headers - a dict of key value pairs to add to the http headers
Note
for example: Content-Type: application/json
See Example here: Example REST Skillet and here: Example REST Skillet with Output Capturing
- python3
- name - name of the script to execute
- file - relative path to the python script to execute
- input_type - Optional type of input required for this script. Valid options are ‘cli’ or ‘env’. This will determine how user input variables will be passed into into the script. The default is ‘cli’ and will pass variables as long form arguments to the script in the form of –username=user_input where username is the name of the variable defined in the variables section and user_input is the value entered for that variable from the user. The other option, ‘env’ use cause all defined variables to be set in the environment of the python process.
See Example here: Example Python Skillet
Defining Variables for User input
Each skillet can define multiple variables that will be interpolated using the Jinja2 templating language. Each variable defined in the variables list should define the following:
- name: The name of the variable found in the skillets. For example:
{{ name }}
- description: A brief description of the variable and it’s purpose in the configuration. This will be rendered as the field label in the UI.
- default: A valid default value which will be used if no value is provided by the user.
- type_hint: Used to constrain the types of values accepted. May be implemented by additional third party tools. Examples are text, text_field, ip_address, password, dropdown, and checkbox.
- force_default: The UI will be pre-populated with a value from the loaded environment or with a previously entered value unless this value is set to True. The default is False. Setting to True will ensure the default value will always be rendered in the panhandler UI.
- required: Determines if a value is required for this field. The default is False.
- help_text: Optional attribute that will be displayed immediately under the field. This is useful for giving extra information to the user about the purpose of a field.
Note
The variable name must not contain special characters such as ‘-’ or ‘*’ or spaces. Variable names can be any length and can consist of uppercase and lowercase letters ( A-Z , a-z ), digits ( 0-9 ), and the underscore character ( _ ). An additional restriction is that, although a variable name can contain digits, the first character of a variable name cannot be a digit.
Variable Example:
Here is an example variable declaration.
- name: FW_NAME
  description: Firewall hostname
  default: panos-01
  type_hint: text
  help_text: Hostname for this firewall.
  allow_special_characters: false
  attributes:
    min: 6
    max: 256
See Variables for a complete reference of all available type_hints.
Hints
Ensuring all variables are defined
When working with a large amount of configuration temlates, it’s easy to miss a variable definition. Use this one-liner to find them all.
cd into a skillet dir and run this to find all configured variables:
grep -r '{{' . | cut -d'{' -f3 | awk '{ print $1 }' | sort -u
Of, if you have perl available, the following may also catch any configuration commands that may have more than one variable defined:
grep -r '{{' . | perl -pne 'chomp(); s/.*?{{ (.*?) }}/$1\n/g;' | sort -u
YAML Syntax
YAML is notoriously finicky about whitespace and formatting. While it’s a relatively simple structure and easy to learn, it can often also be frustrating to work with, especially for large files. A good reference to use to check your YAML syntax is the YAML Lint site.
Jinja Whitespace control
Care must usually be taken to ensure no extra whitespace creeps into your templates due to Jinja looping constructs or control characters. For example, consider the following fragment:
<dns-servers>
{% for member in CLIENT_DNS_SUFFIX %}
    <member>{{ member }}</member>
{% endfor %}
</dns-servers>
This fragment will result in blank lines being inserted where the ‘for’ and ‘endfor’ control tags are placed. To ensure this does not happen and to prevent any unintentioal whitespace, you can use jinja whitespace control like so:
<dns-servers>
{%- for member in CLIENT_DNS_SUFFIX %}
    <member>{{ member }}</member>
{%- endfor %}
</dns-servers>
Note
Note the ‘-’ after the leading ‘{%’. This instructs jinja to remove these blank lines in the resulting parsed output template.
Creating and Editing Skillets
In Panhandler 4.0, you now have the ability to generate Skillets dynamically. This feature works by generating the difference between two saved configurations. These configurations can the candidate, running, baseline, or any saved configuration. The currently supported options for skillet generation are:
- Skillet from a running PAN-OS or Panorama instance using saved configurations or the running configuration
- Skillet from two exported configurations
- Set commands from a running PAN-OS or Panorama instance using saved configurations or the running configuration
- Set commands from two exported configurations
- Full Configuration template from a saved configuration

Skillet Editor
The Skillet Editor allows you to copy, edit, create, and delete Skillets in a local branch of a repository. The Editor allows GUI based editing of all aspects of a Skillet including editing and ordering snippets, dynamically detecting variables, creating and ordering variables, and updating the metadata.

The Skillet Editor currently supports the following skillet types:
- panos
- panorama
- pan-validation
- rest
- template
Other Tools
If you prefer a CLI experience, check out SLI
For more information, see the Skillet Builder documentation.
PAN-OS Validation Skillets
PAN-OS Validation skillets are used to check the compliance of a PAN-OS device configuration. They are comprised of a series of ‘tests’ that each check a specific portion of the configuration. Validation tests can be executed in both ‘online’ as well as ‘offline’ mode.
Online mode will query the running configuration of a running NGFW via it’s API.
Offline node will execute the tests against an uploaded configuration file. This is especially useful to checking things like configuration backups, or devices where direct API access is not possible.
Validation Tests
Each test is evaluated using jinja boolean expressions. This means each test can only result in a pass or fail. In order to perform simple logical operations on the XML configuration, it must first be converted into variables that can be passed to the jinja templating engine. Once the variables have been captured, we can test each one of them with some logical operation.
Variable Capturing
Panhandler will automatically inject the ‘config’ variable into the validation skillet context to simplify capturing additional variables from it. The ‘config’ variable is the ‘running’ configuration from the target device, or an uploaded configuration from the user. In either case, the ‘config’ variable will always be present for validation skillets.
The following example shows variable capturing:
- name: parse config variable and capture outputs
    cmd: parse
    variable: config
    outputs:
      # create a variable named 'zone_names' which will be a list of the attribute 'names' from each zone
      # note the use of '//' in the capture_pattern to select all zones
      # the '@name' will return only the value of the attribute 'name' from each 'entry'
      - name: zone_names
        capture_pattern: /config/devices/entry/vsys/entry/zone//entry/@name
      # note here we can combine an advanced xpath query with 'capture_object'. This will capture
      # the full interface definition from the interface that contains the 'ip_to_find' value
      - name: interface_with_ip
        capture_object: /config/devices/entry/network/interface/ethernet//entry/layer3/ip/entry[@name="{{ ip_to_find }}"]/../..
This example captures two variables from the config: ‘zone_names’ and ‘interface_with_ip’. The ‘parse’ cmd type informs Panhandler that this step is going to pass the variable named in the ‘variable’ attribute to the output. The ‘outputs’ attribute will then determine what specific parts of this variable we want to capture. The value of the ‘outputs’ attribute is a list of dicts. Each dict represents one new variable that will be captured. The two options for what you want to capture are ‘capture_pattern’ and ‘capture_object’. Both types will query the ‘config’ variable using an XPATH expression. The main difference is in how the results of that query are processed and returned.
Capture Pattern
The ‘capture_pattern’ attribute will try to intelligently interpret the results of the XPATH query. This is most useful as in the above when you would like to return a list of element attributes, or a list of element text values.
In the above example, the variable ‘zone_names’ will be a list with the following:
zone_name = [
  "trust",
  "untrust",
  "dmz"
]
Capture Object
The ‘capture_object’ attribute will convert the returned XML into an dictionary object using the python ‘xmltodict’ library. This is especially useful when you want to perform a large number of tests on the same basic part of the config. This allows you to ‘capture’ one part of the config, then perform logic against lots of different parts of it.
In the example above, the variable ‘interface_with_ip’ will have the value:
interface_with_ip = {
  "layer3": {
    "ip": {
      "entry": {
        "@name": "10.10.10.10/24"
      }
    }
  }
}
Validation Testing
Once you have captured the various variables you want to test, use the ‘validate’ cmd type.
For example:
- name: zones_are_configured
  cmd: validate
  label: Ensure at least one zone is Configured
  test: zone_names is not none
  documentation_link: https://iron-skillet.readthedocs.io/en/docs_dev/viz_guide_panos.html#device-setup-management-general-settings
The ‘test’ attribute uses the jinja expression language to perform a boolean test on the supplied expression. In this example, if zone_names is defined and has a value, then the test will pass.
A more complex example
This example is slightly more complex and uses a number of features to accomplish this compliance check:
- name: device_config_file
  cmd: parse
  variable: config
  outputs:
    # capture all the xml elements under statistics-service for later evaluation
    - name: telemetry
      capture_object: /config/devices/entry[@name='localhost.localdomain']/deviceconfig/system/update-schedule/statistics-service

- name: telemetry_fully_enabled
  label: enable all telemetry attributes
  test: |
    (
    telemetry | element_value('statistics-service.application-reports') == 'yes'
    and telemetry | element_value('statistics-service.threat-prevention-reports') == 'yes'
    and telemetry | element_value('statistics-service.threat-prevention-pcap') == 'yes'
    and telemetry | element_value('statistics-service.passive-dns-monitoring') == 'yes'
    and telemetry | element_value('statistics-service.url-reports') == 'yes'
    and telemetry | element_value('statistics-service.health-performance-reports') == 'yes'
    and telemetry | element_value('statistics-service.passive-dns-monitoring') == 'yes'
    and telemetry | element_value('statistics-service.file-identification-reports') == 'yes'
    )
  fail_message: telemetry should be enabled for all attributes
  documentation_link: https://iron-skillet.readthedocs.io/en/docs_dev/viz_guide_panos.html#device-setup-telemetry-telemetry
Here, we first capture the XML elements found under ‘statistics-service’ if any are found. This is then converted into a variable object with the name ‘telemetry’. The ‘telemetry’ object when fully configured will have the following structure:
telemetry = {
  "statistics-service": {
    "application-reports": "yes",
    "threat-prevention-reports": "yes",
    "threat-prevention-pcap": "yes",
    "threat-prevention-information": "yes",
    "passive-dns-monitoring": "yes",
    "url-reports": "yes",
    "health-performance-reports": "yes",
    "file-identification-reports": "yes"
  }
}
To facilitate a simple syntax to check this, custom jinja filters have been developed including ‘element_value’. We use ‘element_value’ here to return the value found at a specific ‘path’ inside the object. The ‘path’ is a ‘.’ or ‘/’ separated list of attributes to check.
# this will evaluate to true in this case because the path 'statistics-service.application-reports' exists
# and the value found therein is equal to the desired value of 'yes'
telemetry | element_value('statistics-service.application-reports') == 'yes'
For more information about all available custom filters and their example uses, see the list of filters documentation here.
PAN-OS Validation Examples
To get a sense of all that is possible, here are a couple of complete examples.
CIS Benchmarks will validate a PAN-OS device for CIS compliance.
STIG Benchmarks will validate a PAN-OS device for STIG compliance.
Hints, Tips, Tricks
Start with a Pass
Because you often need to know the structure of the configuration and the resulting objects, it is always a good idea to start with a fully configured PAN-OS NGFW that will ‘pass’ the validation test you are writing.
Use Tools to explore the config
You can also use the `Skillet Builder`_ tools found on github here: https://github.com/PaloAltoNetworks/skilletbuilder. These are a set of Skillets designed to aid in building Skillets and especially Validation Skillets. Start with an example validation skillet from here: https://github.com/PaloAltoNetworks/skilletlib/tree/master/example_skillets and copy the contents in the ‘Skillet Test Tool’. This will allow you to quickly test various capture patterns and run different types of test quickly. It will also show you the structure of the XML snippets and objects returned from your XPATH queries.
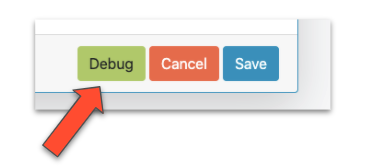
Creating and Debugging Validation Skillets
Panhandler allows you to edit and debug validation skillets using the Skillet Editor. See Creating and Editing Skillets.
From the repository details page, click the ‘edit’ control for the Skillet you want to edit.

At the bottom of the Skillet Editor, click the ‘Debug’ button to enter the Skillet Debugger.
Skillet Debugger
The Skillet Debugger allows you to step through each snippet and see the context between steps. This is especially useful to understand the various captures and filters available.
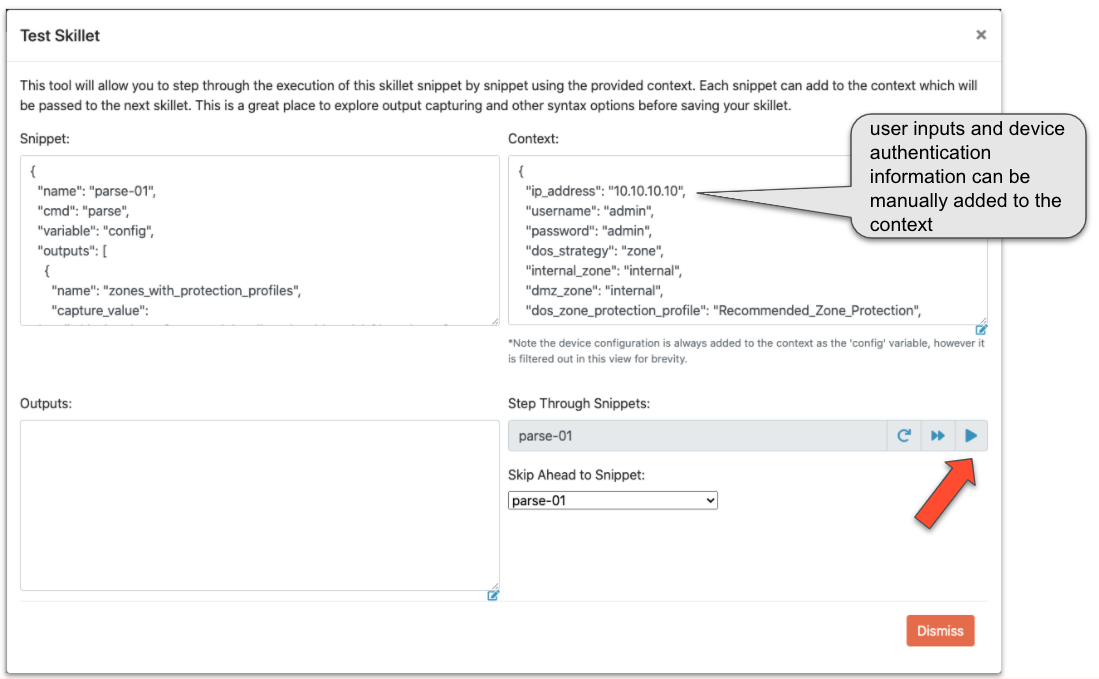
To use the debugger, manually enter Device connection information into the Context input. You may also edit any defined variables here that may impact the skillet logic.
Note
Ensure the context input is valid JSON.
Click the ‘play’ button to execute the next snippet. The ‘Outputs’ will show the returned value from the snippet. The ‘Context’ will also contain all captured values as well. This allows you to quickly experiment with various capture_pattern, capture_list, capture_value, and filter_items options.
You may also use the ‘Skip Ahead to Snippet’ in order to test a specific snippet execution.
Note
Be sure you understand what variables a snippet requires in the context when skipping ahead. In some cases, you’ll need play the snippets in order to get the proper context values in place.
Manual Debugging with SLI
SLI is a command line interface to skilletlib and offers a great way to test and discover all the various features of skillets.
SLI makes it easy to quickly verify XPath queries, capture queries, and so on.
# Test and output a capture_list that displays names of all decryption policies
sli capture list  "/config/devices/entry[@name='localhost.localdomain']/vsys/entry/rulebase/decryption/rules/entry/@name"

# Same as above, except this command will store the output to the default context in the variable "decryption_rules"
sli capture -uc list "/config/devices/entry[@name='localhost.localdomain']/vsys/entry/rulebase/decryption/rules/entry/@name" decryption_rules

# Capturing an object works similar to capturing a list
sli capture object "/config/devices/entry[@name='localhost.localdomain']/vsys/entry/rulebase/decryption"

# Capturing an expression allows further processing on data already stored in the context
sli capture -uc expression "decryption_rules | json_query('[].entry[].category.member[]')"

# Windows requires an additional escape character on double quotes, a ` is required in addition to the \
sli capture -uc expression "decryption_obj | json_query('decryption.rules.entry[].\`"@name\`"')"
SLI is available on Pypi.org and can be easily installed like this:
pip install sli
Manual Debugging with Python
In some cases, it may be desirable to use Python or a debugger like PyCharm or pdb for building your validation skillet. Here is an example python script that will load a config file from the local filesystem and run a skillet. You may use the ‘filter_snippets’ option to only run specified snippets as desired.
import json

import click

from skilletlib.skilletLoader import SkilletLoader


@click.command()
@click.option("-c", "--config_file", help="Local Config File", type=str, default="config.xml")
@click.option("-d", "--skillet_dir", help="Skillet Directory", type=str, default=".")
@click.option("-f", "--snippet_filter", help="Snippet Filter Type", type=str, default="")
@click.option("-s", "--snippet_filter_value", help="Snippet Filter Value", type=str, default="")
def cli(config_file, skillet_dir, snippet_filter, snippet_filter_value):
    sl = SkilletLoader()
    skillets = sl.load_all_skillets_from_dir(skillet_dir)
    d = skillets[0]

    context = dict()
    with open(config_file, 'r') as config:
        context['config'] = config.read()

    if snippet_filter != "":
        context['__filter_snippets'] = {
            snippet_filter: snippet_filter_value
        }

    out = d.execute(context)

    print('=' * 80)
    print(json.dumps(out, indent=4))
    print('=' * 80)


if __name__ == '__main__':
    cli()
The above requires ‘click’ and ‘skilletlib’ to be installed. The output will contain all captured values and filtered items in the ‘outputs’ key.
pip install click
pip install git+https://github.com/PaloAltoNetworks/skilletlib.git@develop#egg=skilletlib
For more information, see the Skillet Builder documentation.